

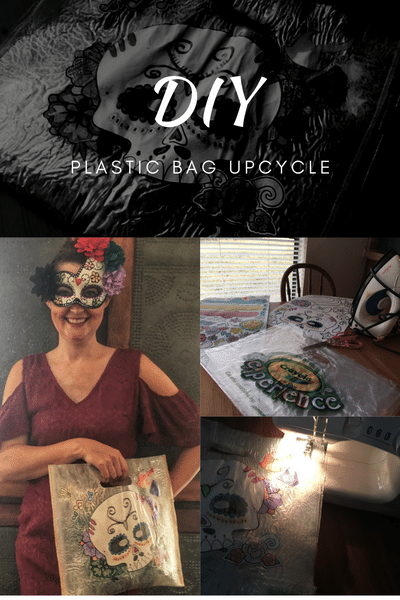
When I took students to Europe in 2012, I looked for ways to help them raise funds. I discovered you can iron plastic bags and sew the results. I used that idea to DIY a Halloween plastic bag upcycle to go with my costume and I love it. This is a really versatile and fun project.

When we lived in Texas we went to the Crayola experience where they had a Day of the Dead costume craft at the watercolor station. I really enjoyed it and wanted to do something with my papers. I left them on the table for about a week. Eventually, I remembered that I had put the paper between plastic bags and ironed them to produce a kind of fabric when I had been working on things we could sell for the Europe trip.

The Crayola Experience gives you bags to hold all your crafts in and I decided to use those bags to melt. They are clear and I thought that would work out well but I cut off the side that had the logo. Target bags are the best store bags to use. Walmart bags are too thin and they will pull apart. Even white bags will allow you to see what is underneath. There are many ways to do a DIY plastic bag upcycle.

I am happy with the results. I have used it to carry around my son’s church coloring books.
Materials Needed for DIY Halloween Plastic Bag Upcycle
- 8 layers of plastic bags for each piece you make
- Paper you have colored on, your child has colored on, or scrapbook paper.
- You can also paint on the second to last layer. Let is dry first!
- An iron
- Baking paper to protect the iron from the plastic.

Step 1
Cut the plastic bags. Cut off the handles and the bottom to create a larger rectangle.
Step 2
Turn the bags inside out so the ink does not smear on the paper.
Stack the plastic bags 4 layers thick or two bags.
Step 3
Iron should be set between rayon and polyester.
Fuse two bags together at a time.
You will have four sheets after this.
Step 4
Start to fuse them all together one layer at a time. Keep flipping back and forth to keep it flat.
Step 5
After you have created two sheets made with four plastic bags each you can add your art or scrapbbook paper. Make sure there is space around the art or paper to melt together.

Step 4
Apply a sheet of clear or white plastic over the paper. Iron again.
Step 5
After cooling cut the two sheets to make a uniform shape.
Step 6
Sew straight lines on three sidies to make a bag.

Enjoy your one of kind bag! Let me know what you added to your bag in the comments!


Cool!!